If you are familiar with editing and adding data in Ancestry.co.uk -.com then you will find that many of the principles you learned there apply here – you’ll just need to adjust to the different look and feel. Where there are significant differences in the editing experience these will be highlighted for you.
Although this site looks very different to some of the big commercial genealogy sites such as Ancestry, it shares the principle that everything you do is centred on a PERSON. Whether it’s adding a partner or spouse, a photo, a citation, a note, a parent, a child or an event it’s done from the context of a person, There are a few exceptions but they are mostly in areas where Ancestry doesn’t even go and we’ll deal with those as they arise. The important thing is that whilst the TNG user interface may look different to Ancestry’s, the data attachment concept is the same – we do it from an existing person’s record.
If you’re a newbie, don’t worry, we’ve all been there and the world won’t end if you make a mistake.
You can edit TNG data on any device but it’s a lot easier on a laptop or desktop and essential if you want to add media files.
Most browsers are supported. I have used Chrome, Chrome for Mobile, Opera and Firefox. Overall I find Firefox to be the best option, because browser warning messages appear in the centre of the screen so can’t be missed
The most obvious first action you’ll want to take is to enter some people. And we will get to that as soon as we can but first there are some important data principles we need to cover. These principles apply across the entire application
Citations from sources are important because they provide evidence that other people can use to verify the data we enter.
- Without a citation to support it, the details of an event are no more than an opinion.
- Citations allow web search engines to index our site better which
- results in better information, more easily found by other family researchers
- has the potential to increase people identifying with us and offering up useful information to us.
- Citations allow us to provide textual information about a document we have attached. Digital images of BMD certificates, census returns, employment documents, military service records, for example, provide a very visually engaging site but cannot be indexed by search engines.
A citation is simple to create.
Guiding Principle
Citations are essential. If you do not have a digital image of a document to support an event, then a citation pointing to the source of your information is needed to elevate the event from opinion to verifiable fact. If you have a document then a matching citation is essential to make the fact discoverable by search engines.
The components of a Citation Record
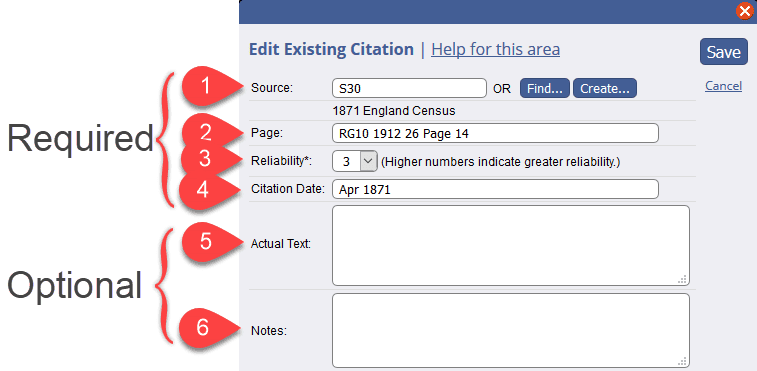
![]() Source refers to the title of the source document, in this case the 1871 England Census. the name is not entered repeatedly though. Instead we use a reference to a separate data table of sources. This means we get consistent labelling across all records and that we can find all records where the 1871 England Census is used. Sources are recorded by source CODE not title. For example the 1911 England Census is referred to in our system as S45.
Source refers to the title of the source document, in this case the 1871 England Census. the name is not entered repeatedly though. Instead we use a reference to a separate data table of sources. This means we get consistent labelling across all records and that we can find all records where the 1871 England Census is used. Sources are recorded by source CODE not title. For example the 1911 England Census is referred to in our system as S45.
![]() Page allows someone to see exactly where in the source registry the record can be found. Page is a loose term. In the case of this census record for example we have provided the complete record identifier including volume, section and page. The objective is to allow a researcher to go straight to that record themselves and independently verify it.
Page allows someone to see exactly where in the source registry the record can be found. Page is a loose term. In the case of this census record for example we have provided the complete record identifier including volume, section and page. The objective is to allow a researcher to go straight to that record themselves and independently verify it.
![]() Reliability is a tricky one. There is no definitive definition of “reliability.” Instead it’s up to researchers to apply their own standard. The possible values are NULL and 0 – 3 where 3 is the most highly rated source. The interpretations I have used are:
Reliability is a tricky one. There is no definitive definition of “reliability.” Instead it’s up to researchers to apply their own standard. The possible values are NULL and 0 – 3 where 3 is the most highly rated source. The interpretations I have used are:
NULL = unrated
2 = Provided by a third party and taken on trust
3 = Provided by one of us based on evidence we have found directly
![]() Citation Date is required where the title of the citation is not specific, for example “Birth Register” and “Births 1827 – 1965” are not specific, whereas “England Census 1871” is, because that took place on a specific, verifiable date.
Citation Date is required where the title of the citation is not specific, for example “Birth Register” and “Births 1827 – 1965” are not specific, whereas “England Census 1871” is, because that took place on a specific, verifiable date.
![]() Actual text is optional because if fields 1 – 4 are completed then there really is little point in trying to paraphrase a document that is in the public domain. If you feel it is helpful then do it, but don’t feel obliged.
Actual text is optional because if fields 1 – 4 are completed then there really is little point in trying to paraphrase a document that is in the public domain. If you feel it is helpful then do it, but don’t feel obliged.
![]() Notes are optional. This field is for adding commentary that you feel is necessary, perhaps to explain any reservations you have about a citation, or for anything else you want to record about the citation.
Notes are optional. This field is for adding commentary that you feel is necessary, perhaps to explain any reservations you have about a citation, or for anything else you want to record about the citation.
How many citations are required?
An event should have a minimum of one citation but can often have more. For example, a Census record will have one citation but a birth, baptism, marriage or death can have frequently have two – the citation from the appropriate register, and the citation associated with a digital image of a certificate.
One citation can also be used in multiple places. For example, a single Census could be used to support the census entry itself, but also the occupation and address events that the census form reveals for the members of the household.
How to add a citation record
A citation record can be added in dozens of places around the system. The same icon is used throughout. For example, in the Birth, Christening, Death and Burial section of a person’s record.

The green dot on the icon indicates that at least one citation record exists for an event. To view, add, edit or delete a citation, click the icon.

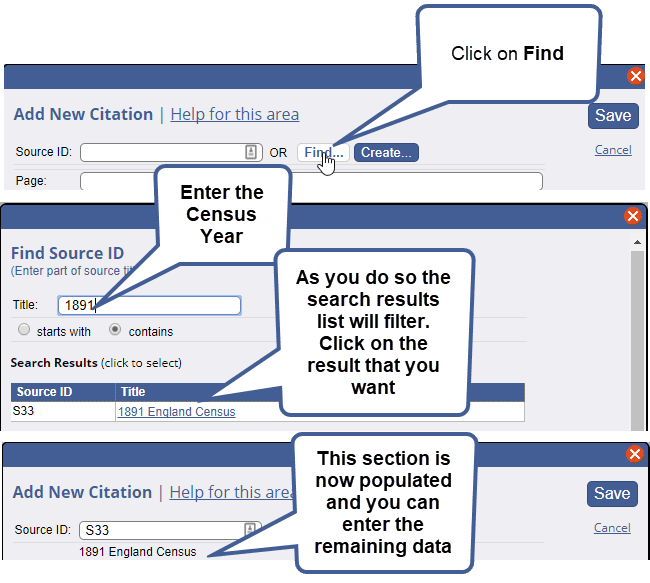
![]() If you know the source ID then you can just enter it here and move on to completing the fields.
If you know the source ID then you can just enter it here and move on to completing the fields.
![]() It is more likely that you will need to press the Find button to look for the correct reference.
It is more likely that you will need to press the Find button to look for the correct reference.
![]() Enter a partial search term. As you type, the list will begin to filter the results based on what you have entered. Tips: The less you enter the more likely you are to find a match. Beware of differing terms for the same event type, for example Baptism for Christening, or Interment for Burial.
Enter a partial search term. As you type, the list will begin to filter the results based on what you have entered. Tips: The less you enter the more likely you are to find a match. Beware of differing terms for the same event type, for example Baptism for Christening, or Interment for Burial.
![]() The auto filter that takes place in step 3 means that pressing the Search button is unnecessary. I am not sure why it’s there.
The auto filter that takes place in step 3 means that pressing the Search button is unnecessary. I am not sure why it’s there.
![]() Select the search result you want by clicking on the title, not the Source ID.
Select the search result you want by clicking on the title, not the Source ID.
![]() The system will return to the Citation screen and will fill in the Source ID field
The system will return to the Citation screen and will fill in the Source ID field
![]() You can double-check that the correct source has been selected by reviewing the Source Title here. If it is incorrect press the Find button again and repeat the search from step 3
You can double-check that the correct source has been selected by reviewing the Source Title here. If it is incorrect press the Find button again and repeat the search from step 3
![]() The Reliability Index uses a simple drop-down selector
The Reliability Index uses a simple drop-down selector
![]() The Citation date must follow the rules for date entries. These are set out in a later section called Use the Correct Date Format. Do not enter anything other than a valid date format or one of the accepted date qualifiers.
The Citation date must follow the rules for date entries. These are set out in a later section called Use the Correct Date Format. Do not enter anything other than a valid date format or one of the accepted date qualifiers.
![]() Saving the record will add the citation to the person’s / family’s record and return you to the Citations screen.
Saving the record will add the citation to the person’s / family’s record and return you to the Citations screen.
![]() If you have more citations to add to the current record, press the Add New Button.
If you have more citations to add to the current record, press the Add New Button.
![]() If you have no more citations to add to this record, press the Finish button.
If you have no more citations to add to this record, press the Finish button.
![]() Most of the sources that you need to use have already been created but if you can’t find the one you want, click the Create… button to add a new one. Then go to the next section to see how it’s done.
Most of the sources that you need to use have already been created but if you can’t find the one you want, click the Create… button to add a new one. Then go to the next section to see how it’s done.
How to add a new Source
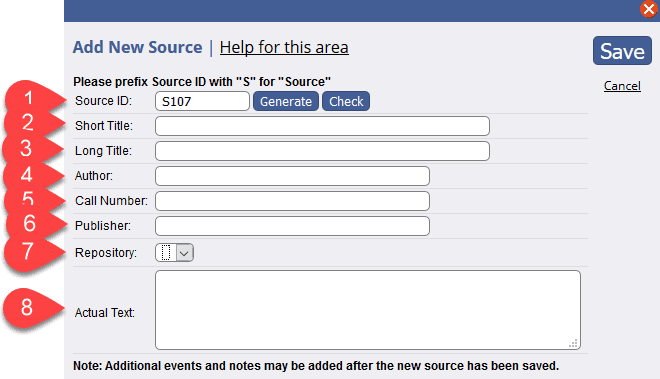
![]() The Source ID is generated by the system. Do NOT change it
The Source ID is generated by the system. Do NOT change it
![]() The Short Title is an abbreviated title for the source.
The Short Title is an abbreviated title for the source.
![]() The Long Title is a more formal, longer title for the source.
The Long Title is a more formal, longer title for the source.
![]() The Author field is only relevant if you are citing from a source that has an identifiable author, such as a book, magazine or online article.
The Author field is only relevant if you are citing from a source that has an identifiable author, such as a book, magazine or online article.
![]() Some Archives and libraries use call numbers so the staff can easily point you the correct place in the building. Just ignore it.
Some Archives and libraries use call numbers so the staff can easily point you the correct place in the building. Just ignore it.
![]() Publisher is self explanatory.
Publisher is self explanatory.
![]() Repository – ignore
Repository – ignore
![]() Actual Text is used for a quote from the source material. This is optional and, unless the source is unique, should be ignored, because details of individual pages from, for example, an entry from the 1871 England Census, are entered against the specific citation, not the source.
Actual Text is used for a quote from the source material. This is optional and, unless the source is unique, should be ignored, because details of individual pages from, for example, an entry from the 1871 England Census, are entered against the specific citation, not the source.
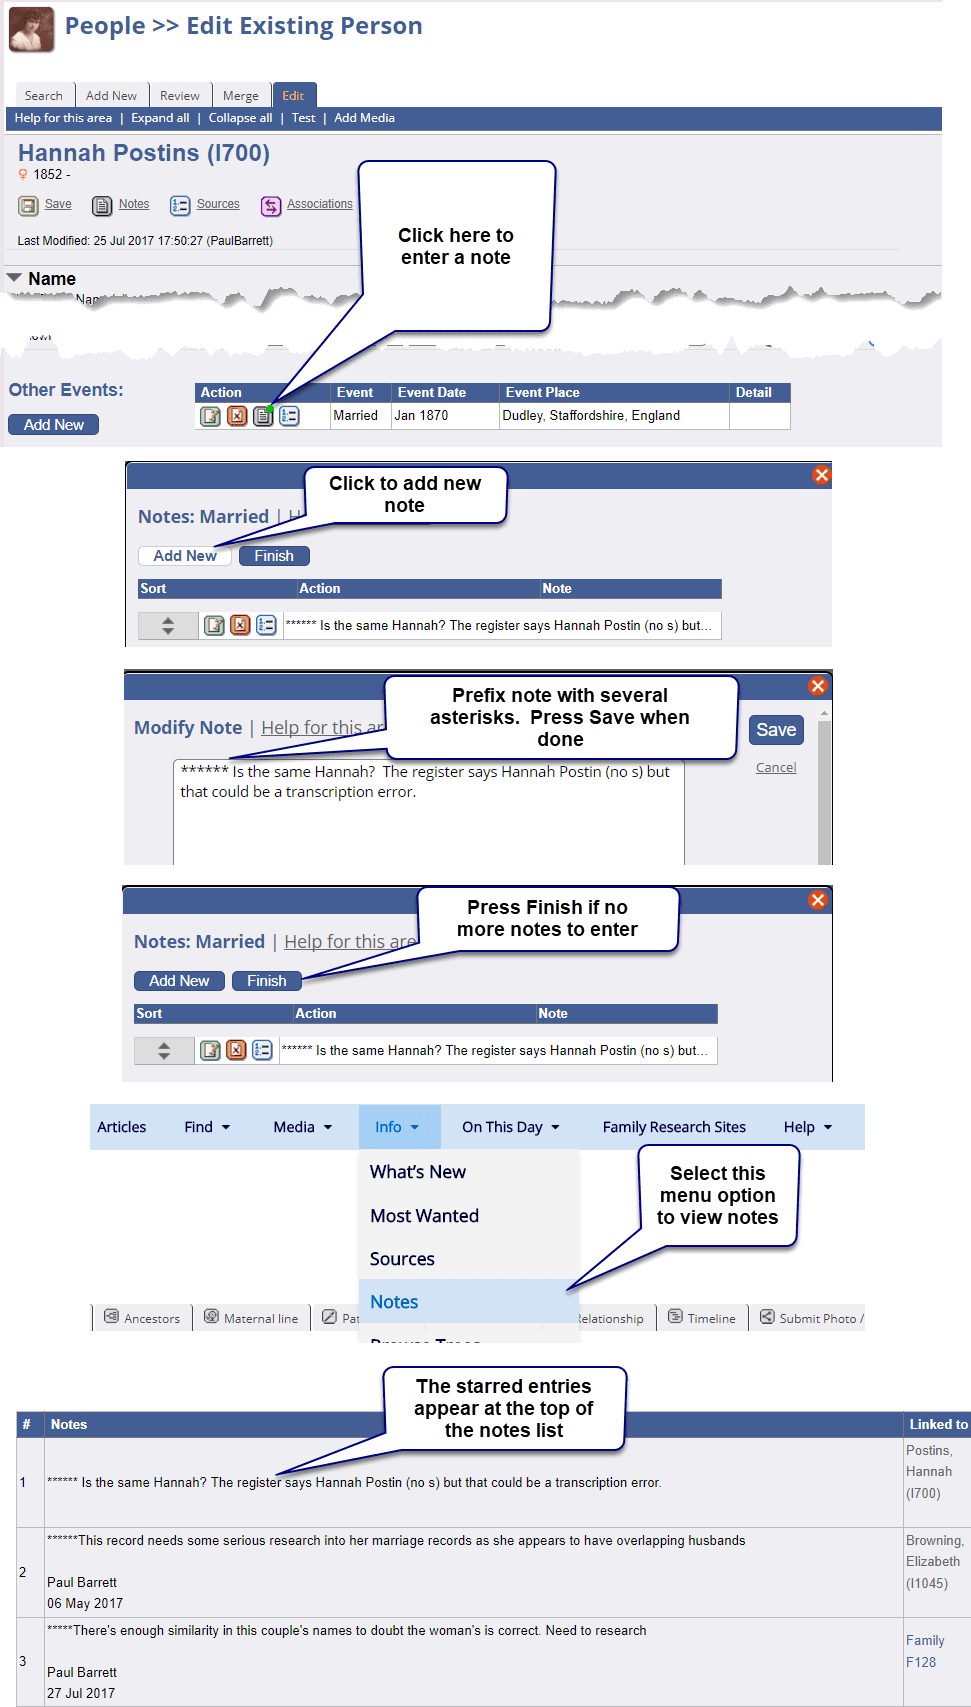
With the massive amount of data that is contained in the system it’s easy to lose touch with items that are not fully resolved, where more research is required.
The easiest way to mark such items is to add starred notes.
How do you do that? Against just about every type of information you enter into TNG you will find the ability to add a note. So add one, like this:
If you enter details of living people on this database you must ensure that their records make clear they are still alive. If you don’t then their details will be public, which contravenes the General Data Protection Regulation.
To mark a person as living:

This box should be checked by default for all records. Make sure this box:
- Remains checked for all living people. But don’t confuse it with the adjacent checkbox marked Private. Checking that box will hide the record from everyone except the admins.
- Is unchecked for for all deceased people
Records such as Person and Family have unique identifiers such as I1234 and F567. These ID’s are generated by the app. Do not edit them or you will break the links between them and other material, such as media.
In Genealogy, dates are very significant and there is one standard genealogical date format. DD Mon YYYY for example 25 Dec 2017 or 1 Apr 2017.
- Days less than 10 can be entered as a single digit but you can enter them with a leading zero too.
- Month names can be entered in sentence or upper case.
- Never use month numbers as these can be misinterpreted in places where the convention differs as to whether the month or day comes first.
Note: Please be very careful to ensure there is only a SINGLE space between each of the date elements. All the following are wrong:
| 1 Apr 1999 | Has a leading space before the first 1 |
| 1Apr 1999 | Has a missing space before Apr |
| 1 Apr 1999 | Has an extra space before Apr |
| 1/4/1999 | Has an invalid separator AND a month number– use a space not a /, and a 3 letter month NAME |
| 1-4-1999 | Has an invalid separator AND a month number– use a space not a -, and a 3 letter month NAME |
| ?? 4 1999 | Has a placeholder AND a month number. Drop the placeholder and use a month NAME e.g. Apr 1999 |
All these errors will cause the date calculators in TNG to fail so, for example the system will be unable to display a person’s age.
If you are sure an event occurred, but not sure of the exact date you can qualify the date with one of several date approximation modifiers. Your best estimate is better than nothing in a system where dates are essential. There are many qualifiers but the most common are:
ABT – About, meaning not exact e.g. ABT 1900 or Apr 1800
BEF – Before e.g. BEF a year, a month and year, or a date
AFT – After e.g. After a year, a month and year, or a date
BET – Between two dates e.g. BET Jan 1852 AND Jun 1852 (note the AND)
If you need to enter a British Registration Quarter Date do NOT use e.g. Q1 1923 or 1st Quarter 1923. These British terms are not used in many other places so are not recognised by GEDCOM. Instead use Abt Feb 1923 i.e the middle month of the quarter or, if you want to be pedantic “Bet 31 Dec 1922 and 1 Apr 1923” i.e. the days before and after the quarter dates.
You can access a fuller explanation of the date qualifiers as well as the less common ones {FROM, TO, CAL(culated) and EST(imated)} by clicking here. And if you want to use the less common ones, go ahead. There’s no system limitation.
The difference between ABT (About) and EST (Estimated) is a challenge. ABT has greater certainty. So, in the case of Q1 1923 we know that Abt Feb 1923 has a high degree of accuracy based on the written record. On the other hand, if a Death Certificate gives a year of birth of 1790 and there is no other evidence to support that, the date should be entered as Est 1790 because people’s memories of when their spouse was born can be notoriously unreliable, especially among the illiterate classes of the 19th century and earlier.
The acceptable date formats are shown in the previous section.
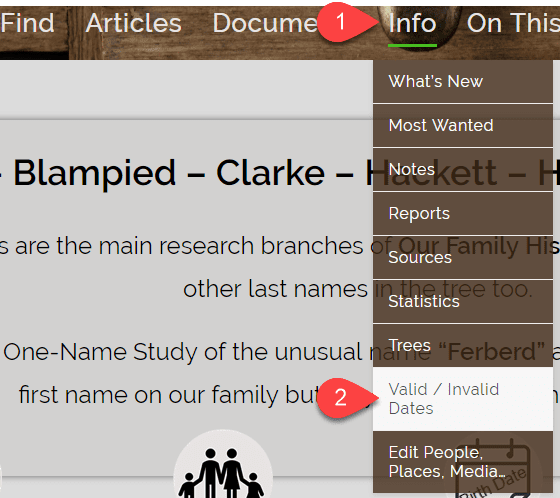
Currently, TNG does not prevent you from entering invalid dates, so it is easy to enter a date incorrectly, especially if you cut and paste the data from elsewhere. To help you identify incorrect dates, a report option has been added to the menu.
Selecting the option
The menu option is available to all users. It is recommended that you run this periodically, especially if you are doing intensive adds / edits to the data.
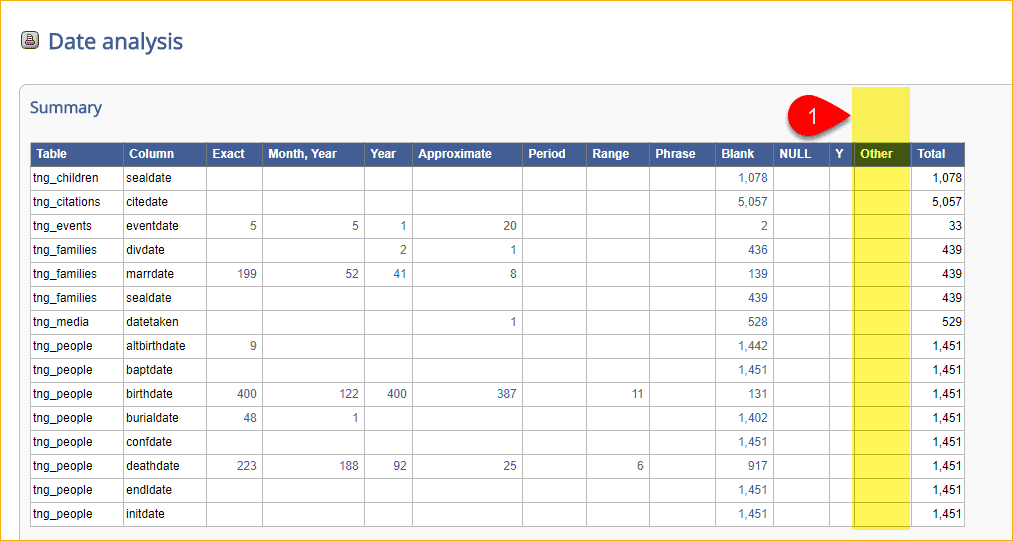
Interpreting the Analysis Report
The aim is to ensure that the column indicated (1) is empty. Any date that does not conform to the GEDCOM standard will appear here as a number in one of the rows. Clicking on the number will display a list of the affected records which you can then edit to correct the date.
The analysis is smart enough to recognise the allowed GEDCOM qualifiers such as:
- BEF = before
- ABT = about
- AFT = after
- BET = between date 1 AND date 2
In a perfect world, all the columns would be blank except the one called Exact. But in the real world, we’ll settle for just the Other column being blank.
Where to add a person (and where not to)
You add a new person by attaching them to an existing person – as a partner/spouse, child, sibling or parent. If you add someone to the existing tree through a relationship to someone who already has all of those ancestral, sibling and descendant relationships defined, the new person will inherit them.
How to add a Person
First, find the target person to whom you wish to attach the new person, go to their record and select the edit option. You can then choose what type of relationship you want to add. In our example we will add a spouse. The red letter codes refer to the indicated places in the screenshot that is displayed after the text.

A: Scroll down the page to to the Spouses / Partners section and click Add New.
The Add New Family Screen will appear.
 At this point I need to call a timeout and explain what’s happening.
On the previous screen we clicked Add New Spouse and we have been brought to a screen that says Add New Family. Confused? I was the first few times it happened to me. Let me explain how it works.
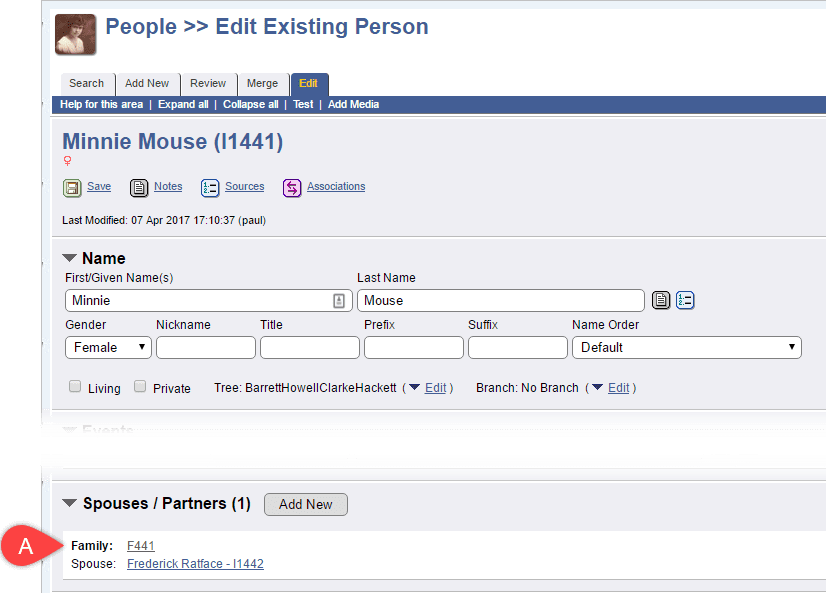
In the world of genealogy centuries’ worth of ancestral lines have formed around the family unit. It is therefore customary to reflect this in the application. So, adding a spouse or partner to a person immediately creates a new family unit in the database regardless of whether the couple have any children – it’s in anticipation of the event. You can see the new family ID F441 in the screenshot.
It may be that the couple decide not to have children or may be unable to do so. Unfortunately they are still considered to be a family.
OK, restart the clock.
B: Select the appropriate gender and press the create button and the Add New Person screen appears.
C: Remember, do NOT change the system assigned ID
D: Enter as much detail as you can for the new person and if they are still living, remember to check the box (E). When you are done, save the record (F)
The Add New Person screen will close and you will be brought back to the Family screen where you can enter more family details if you have them.

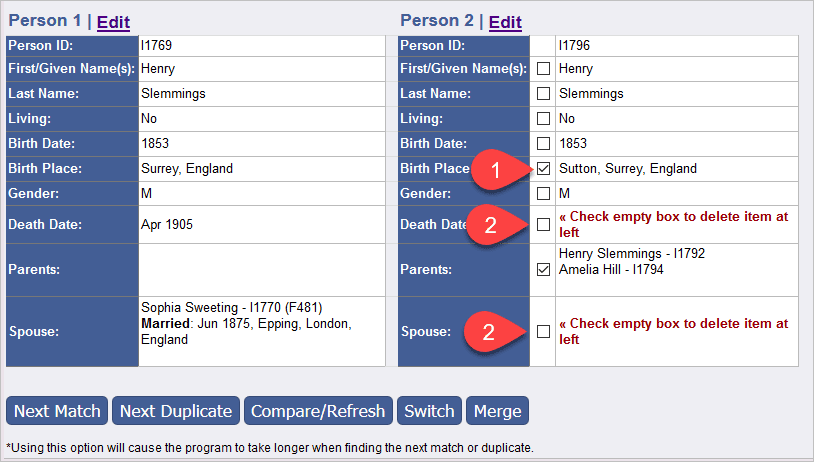
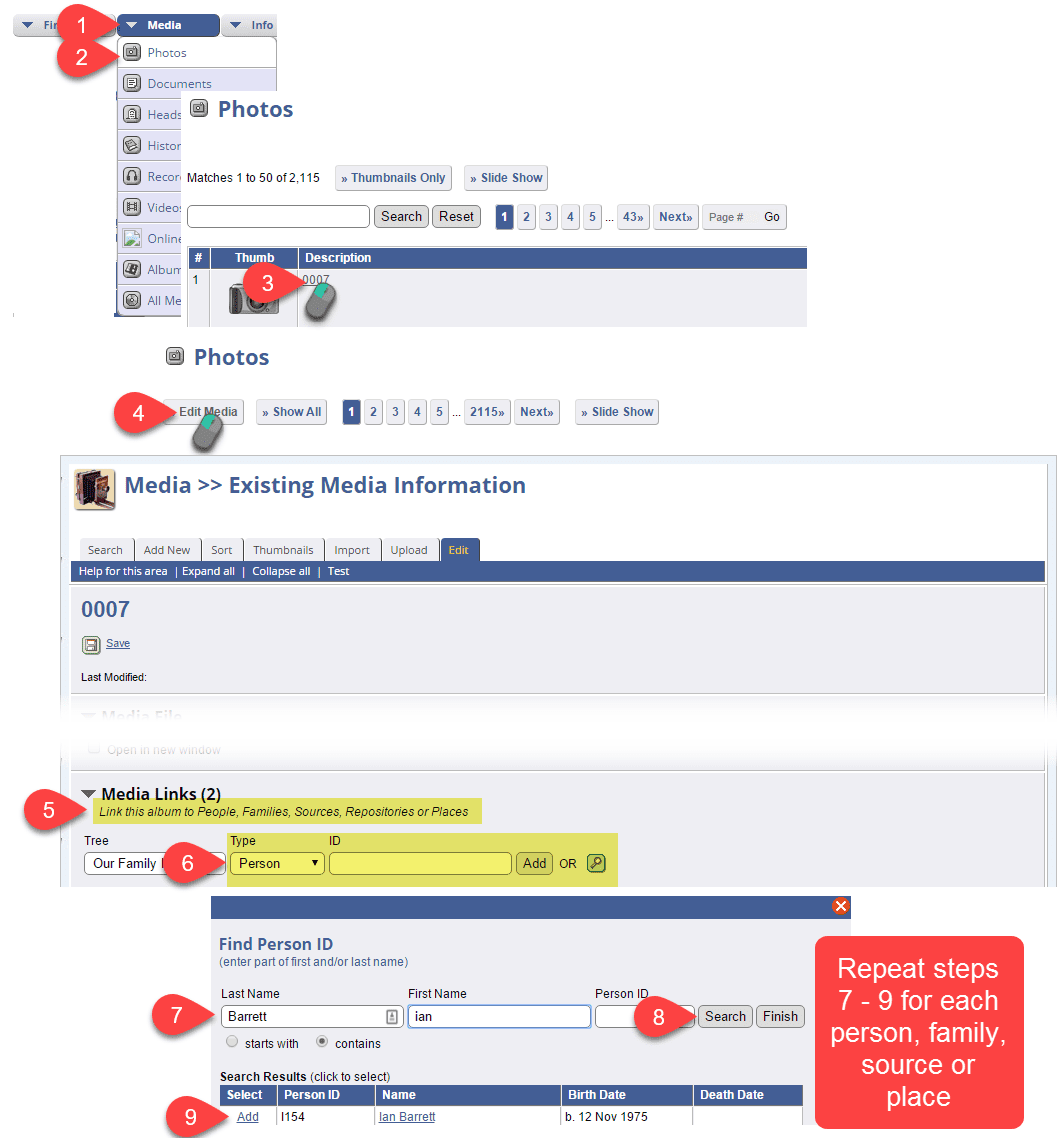
We’ve all done it. And it happens more often than you’d imagine – to the point where there’s a special function to fix it – TNG Admin > People > Merge. Here’s how it works
Step 1
Go to TNG Admin > People > Merge
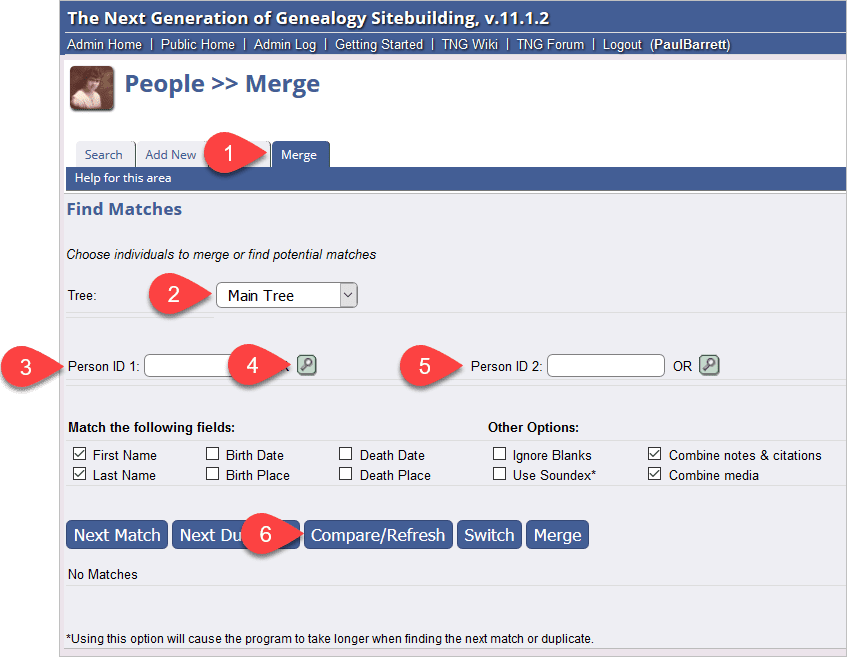
- Select the Merge Tab
- Check you have the correct tree selected
- Enter the ID of the first merge candidate.
- If you don’t know the ID, press the search icon to search for them by name.
- Enter (or search for) the ID of the second merge candidate
- Double check the IDs to make sure they are correct, then press the Compare/Refresh button.
Step 2
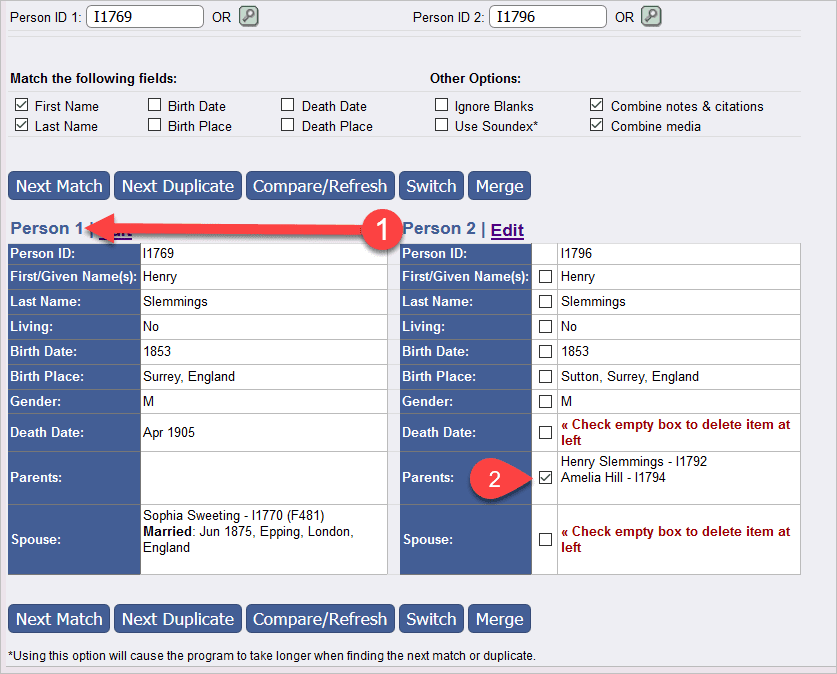
- The merge process will take data from the right-hand record and use it to overwrite the fields in the left-hand record, but only those fields that are selected by checking the boxes.
- The Parents box is pre-checked by the app because it can safely assume that parental relationships can be copied. If parents of those parents exist, the merged record will inherit them. Likewise with children.
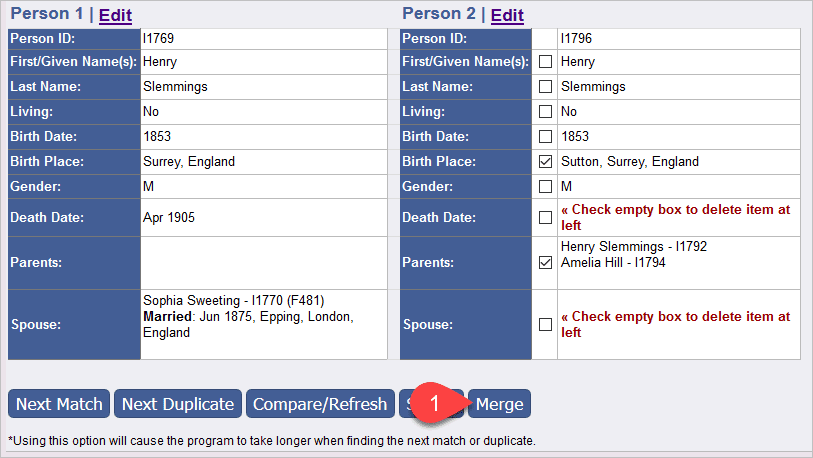
Step 3
The next task is to decide what additional information we want to carry over, and check the boxes.
- In this case a careful examination of the data shows that there is only one field that needs to be merged, the address, which is more complete in the second record than in the first.
- We have the option to delete the data in the left-hand record if it’s incorrect, but we don’t need to because it’s better than we have in the right-hand record.
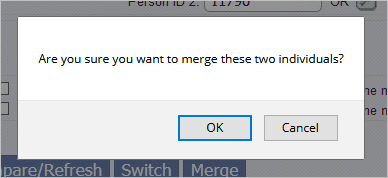
Step 4
Check, check and check AGAIN
Merging records is an action that cannot be undone / reversed. If you change your mind after you merge records the only way to fix it is manually.
Remember, the data from the checked fields in the right-hand record are merged onto the same fields in the left-hand record.
![]()
When you have checked the data, press the Merge button and accept the confirmation prompt
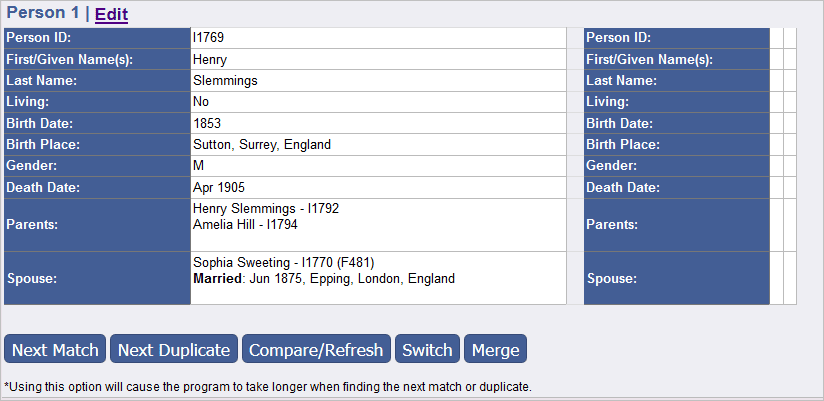
The records are merged and a confirmation screen shows the result. The other ID is deleted.
And that, as they say, is all there is to it!
The most likely scenario for this is that it’s an historical marriage record where the woman’s name is not given.
There are several ways to approach this. Some use a standard number of underscores “_______” to indicate an unknown name. On this site we have decided that it makes sense to be a little more explicit and use the husband’s name in brackets e.g.(Barrett). This sorts them all to the top of the names list while giving us some context on how the record was created.
There are two ways to do this, on the same page! One uses a sub-menu item and is much quicker.
- Navigate to the existing person’s individual page
- Click the Add Spouse / Partner option in the menu bar and skip to step 7
- OR…. Method 2: Press the Edit tab in the menu bar to enter the Edit Person page
- Scroll down to the Spouses / Partners section and click Add New
Even though you have made no changes a pop-up box will appear in your browser prompting you to Save or Cancel your changes. You have to press Save to proceed to the Add New Family screen - Press the Create button next to the Spouse / Partner (mother or father*) to be added.
- A new pop-up window called Family > Add New Family will appear where the new details are entered.
- Press Save to save their details and to exit the popup window
- On the Family screen press Save and continue to save the new family and exit the Add New Family screen and to continue to the Edit Family screen
*Timeout called.
At this stage you may be wondering why a spouse or partner is entered as a mother or father.
In the world of genealogy centuries’ worth of ancestral lines have formed around the family unit. It is therefore customary to reflect this in the application. So, adding a spouse or partner to a person immediately creates a new family unit in the database regardless of whether the couple have any children – it’s in anticipation of the event. So you add a new partner or spouse in the context of the newly created family unit
Depending on the gender of the spouse / partner you are about to add, you associate the new person with the available Father or Mother field even if the label is the wrong gender for the person. You add the gender of the new person later. Unfortunately the field label will continue to say Mother even if it’s a two father unit, and vice versa.
This doesn’t sit well with modern values where there may be single parents or same sex parents, couples who do not marry but have a family, or where there are no children either by design or by misfortune, whether the couple are married or not. The software has to try and reflect the new paradigm in addition to the old. It’s not easy and for the moment this is the way it is because of the enormous number of ancestors.
Adding children follows a very similar path to adding a new partner. Find either of the two parents, go into edit mode and scroll down to the Spouse / Partner area. Just beneath that you will see a Family entry:
Click on the Family ID (A) to open the Family screen
On the Family screen press the Create button to add a new child and the Add Person screen will appear, Enter the details, save the Person record then save the Family record.

It doesn’t happen often but there are times when only one parent is known and the other’s details cannot be found. How do you create a family without a spouse / partner?
The answer is simple, but easy to overlook as it’s “hidden” at the foot of the Edit Existing Person page. So, find or create the known parent as normal, then edit that person’s record and look for the highlighted link in the image below:
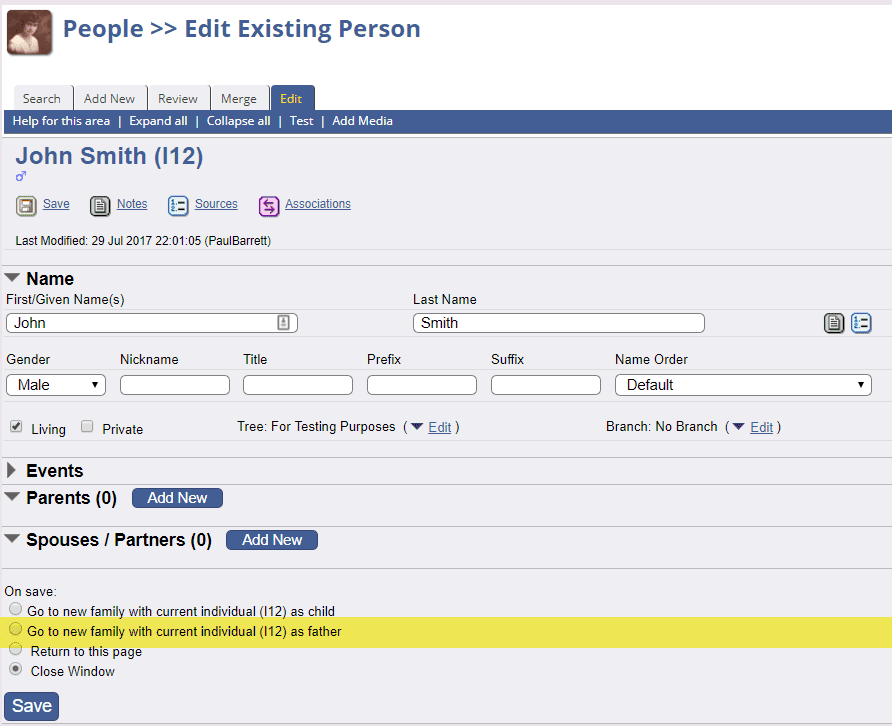
(If the parent is female the item will read “… as mother”)
That will take you a family page where you can add the children.
There are two ways to do this, on the same page! One uses a sub-menu item and is much quicker.
Method 1:
- Navigate to the existing person’s individual page
- Click the Add Parents option in the menu bar and skip to Method 2, Step 5

Method 2:
- Press the Edit tab in the menu bar to enter the Edit Person page
- Scroll down to the Parents section and click Add Ne
- Even though you have made no changes a pop-up box will appear in your browser prompting you to Save or Cancel your changes. You have to press Save to proceed to the Add New Family screen
- Press the Create button next to the parent (mother or father) to be added.
- A new pop-up window will appear where the new parent details are entered.
- Press Save to save their details and to exit the popup window
- On the Family screen press Save and continue to save the new family and exit the Add New Family screen and to continue to the Edit Family screen
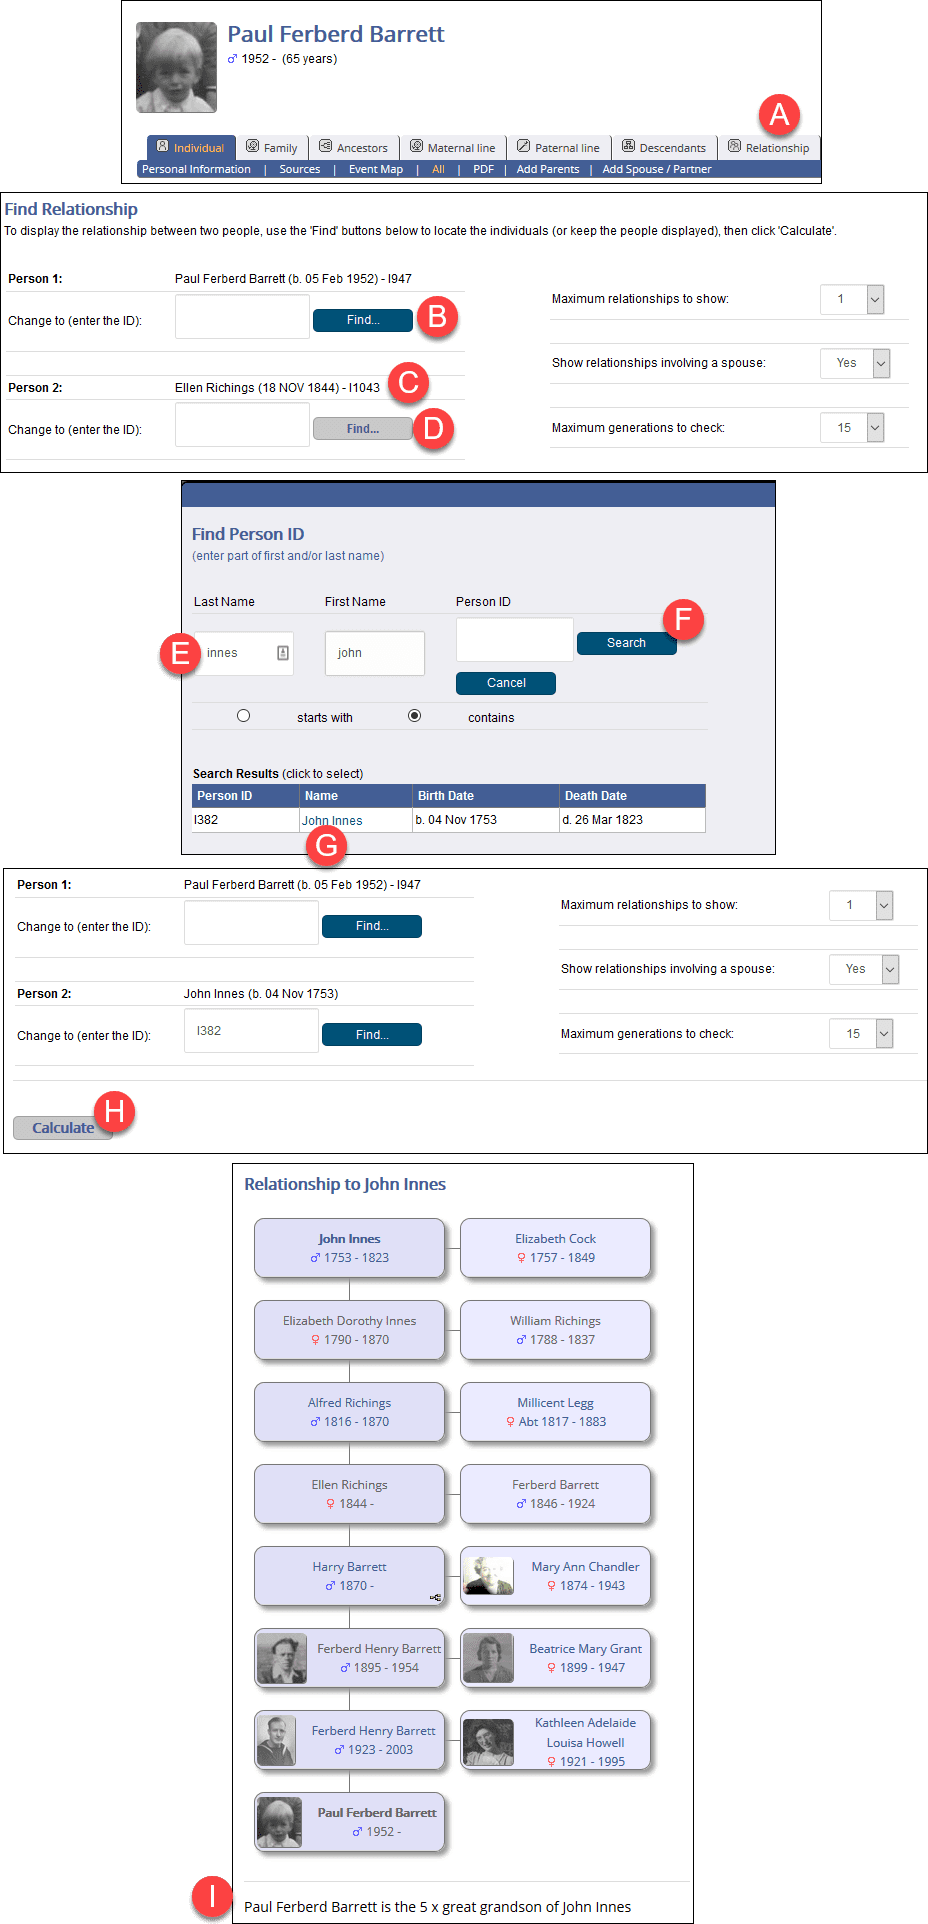
The TNG “Relate” Mod provides a means of displaying the relationship between two people on the tree.
It’s simple to use. Don’t be put off by the number of instructions. It’s easier to do than to describe:
- You can start at any individual’s page.
- By default person 1 will be the current individual but you can change it here, using the instructions that follow.
- By default Person 2 will be the previously calculated individual but you can change it.
- To change the individual click the Find button.
- Enter the last and first names.
- Click Search.
- Select the name in the search results.
- Press the Calculate button.
- The relationship will be displayed.
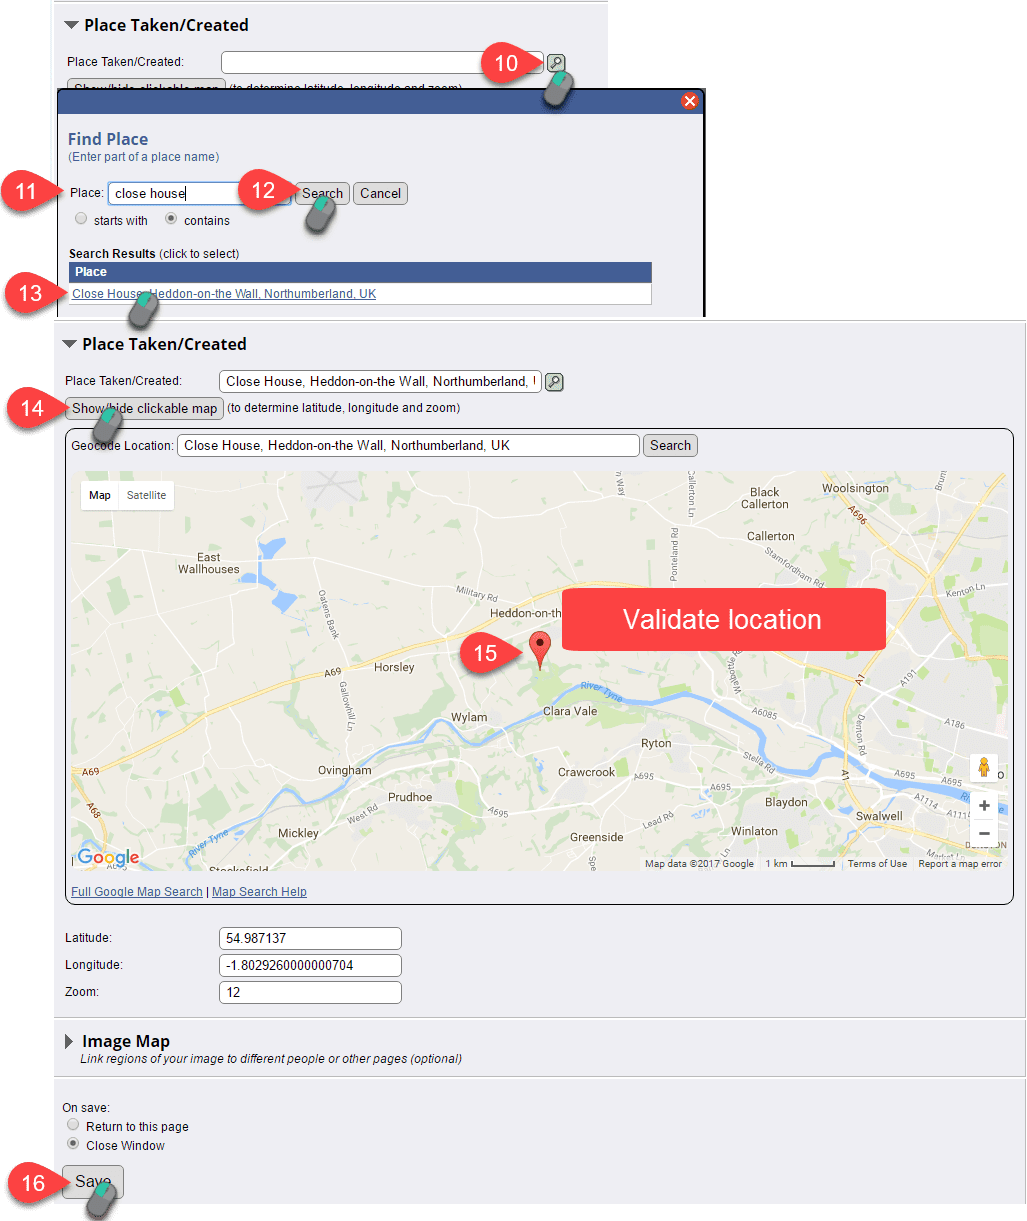
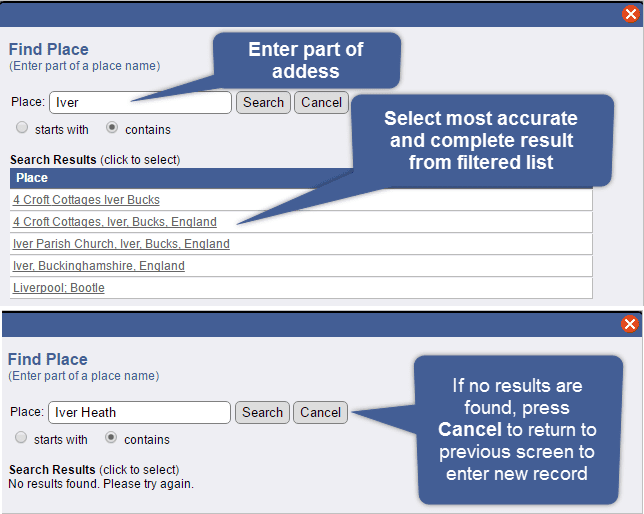
The screenshot deals with birthplace but the process also applies wherever an address is used.
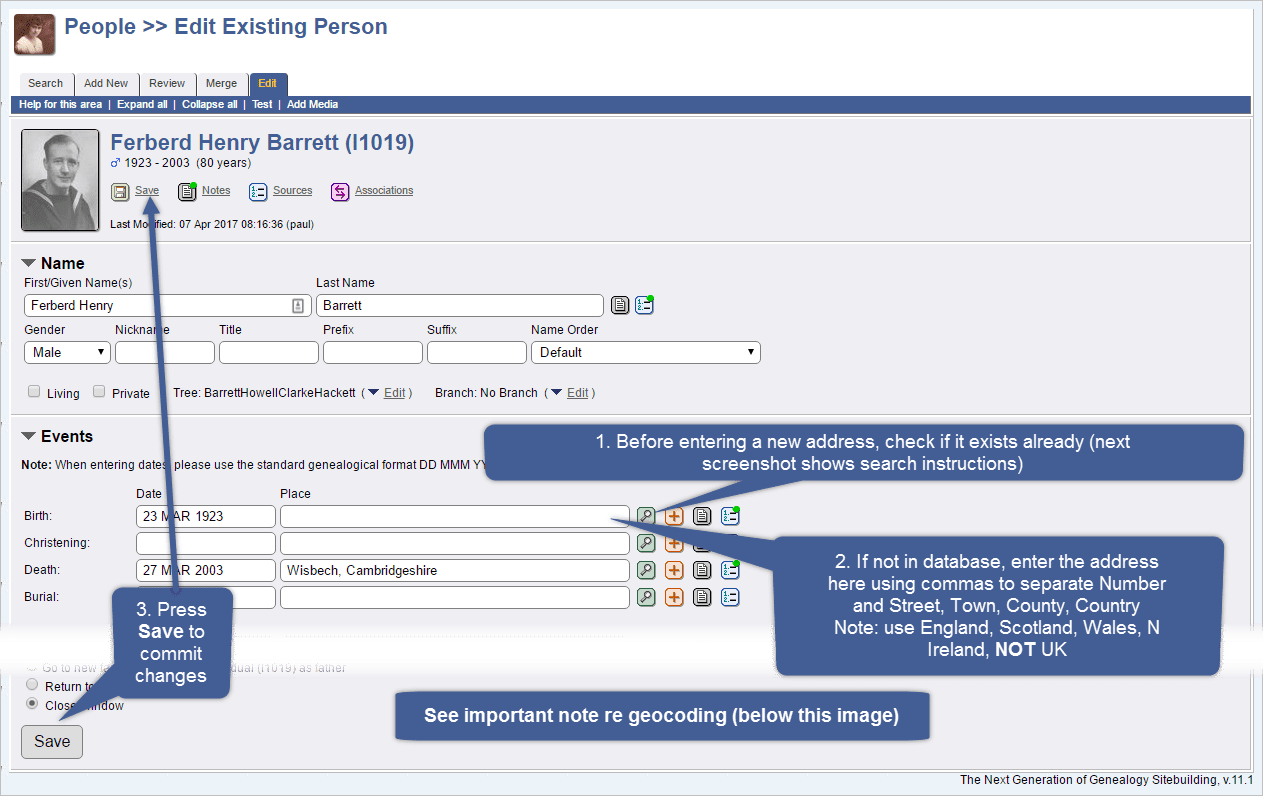
In other genealogy programs, addresses are just text attached to a person, place or event. Duplicates are common as are multiple similar addresses that are, in fact, the same place. In contrast, TNG uses a places database so that one address can be attached to multiple people / events. Amongst other things, this allows us to geocode each address and display where life events occurred, on a map attached to each person’s record. This really helps bring a person’s story alive. But this means we need to disciplined and consistent in how we enter addresses:

- Use the format – house number or name, street, town/city, county, country. For example: 11 Collingwood Drive, Hexham, Northumberland, England.
- Use the full county name to assist genealogists from other countries.
- Do not enter postcodes. They benefit the postal service in the country but are meaningless to researchers from other countries.
- Do not use UK. Use England, Scotland, Wales or Northern Ireland. Again, this is to assist genealogists from other countries
- Always enter a country name. European place names are reused all over North America, Australia and New Zealand in particular, so we need to distinguish ours.
- Separate individual segments of an address with a comma and a space.
- If you do not have a complete address then provide what you can, remembering that the segments are in reverse order of importance, Country first, Town next etc., so ommitting the street address is OK; omitting the country name is not.
- Please do not add anything that is not an address into the address field. This may seem obvious, but we inherited some records that had entries such as “Buried in Fyfield on 19 May 1876.” That’s actually three things – an event, a place and an event date!
- County boundary changes or renames will have affected some places (for example since 1974 Abingdon is part of Oxfordshire but until then was in Berkshire).
- You must record the address that was current at the time of the event, So, if someone was baptised in Abingdon in 1960, use Berkshire.
- This may mean there are multiple address entries for the same location in the places database, pre- and post-date change. That is acceptable in this circumstance. But it’s the only exception.
- Choose carefully when applying addresses from the database. Do you need the modern or historic place name?
- Don’t edit existing database addresses that look wrong until you have checked the actual events to which the address applies. We are dealing with historic records so it’s possible the “wrong” address is the correct address.
- When you geocode the address use the old address for the place name label, but the new address to search and set the geolocation.
- If search results fail it may be because an address no longer exists,
- Enter the old address in the place name label adding “(Site of)” as a prefix (omit the quotes).
- You could add a note to explain further. For example “Building was demolished in 1874 and replaced with…”
- Then geocode to the closest location you can find.
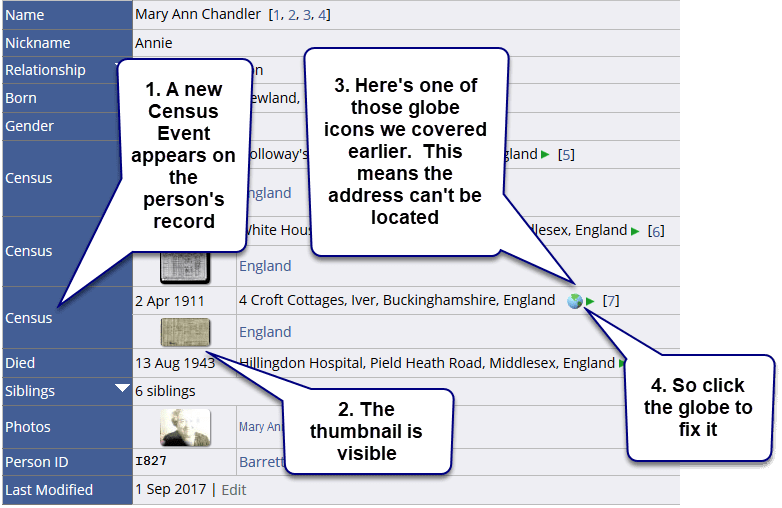
If you follow the instructions in the previous section, addresses will be geocoded as soon as they are created. Sometimes you may find addresses that have not been geocoded. They are easily identified by the globe icon, which is also the link to use to add the geocode:
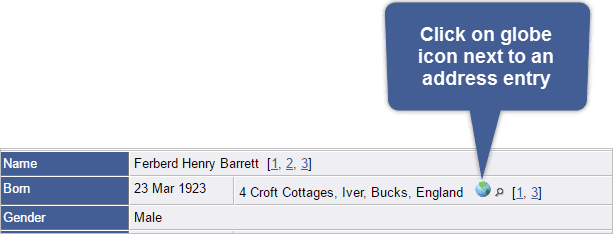

Applying a missing geocode to an address will correct it on every screen where that address is used.
Q. Why do we geocode Places?
A. So we can see useful geolocation data on maps, such as this Event Map for a Person:

This section deals with how to enter standard and custom events, to build out a person’s life story.
Person Events
There are four standard events that are an integral part of a person’s record:
- Birth
- Christening (not baptism – baptism is a specific event for the Church of the Latter Day Saints (Mormons))
- Death
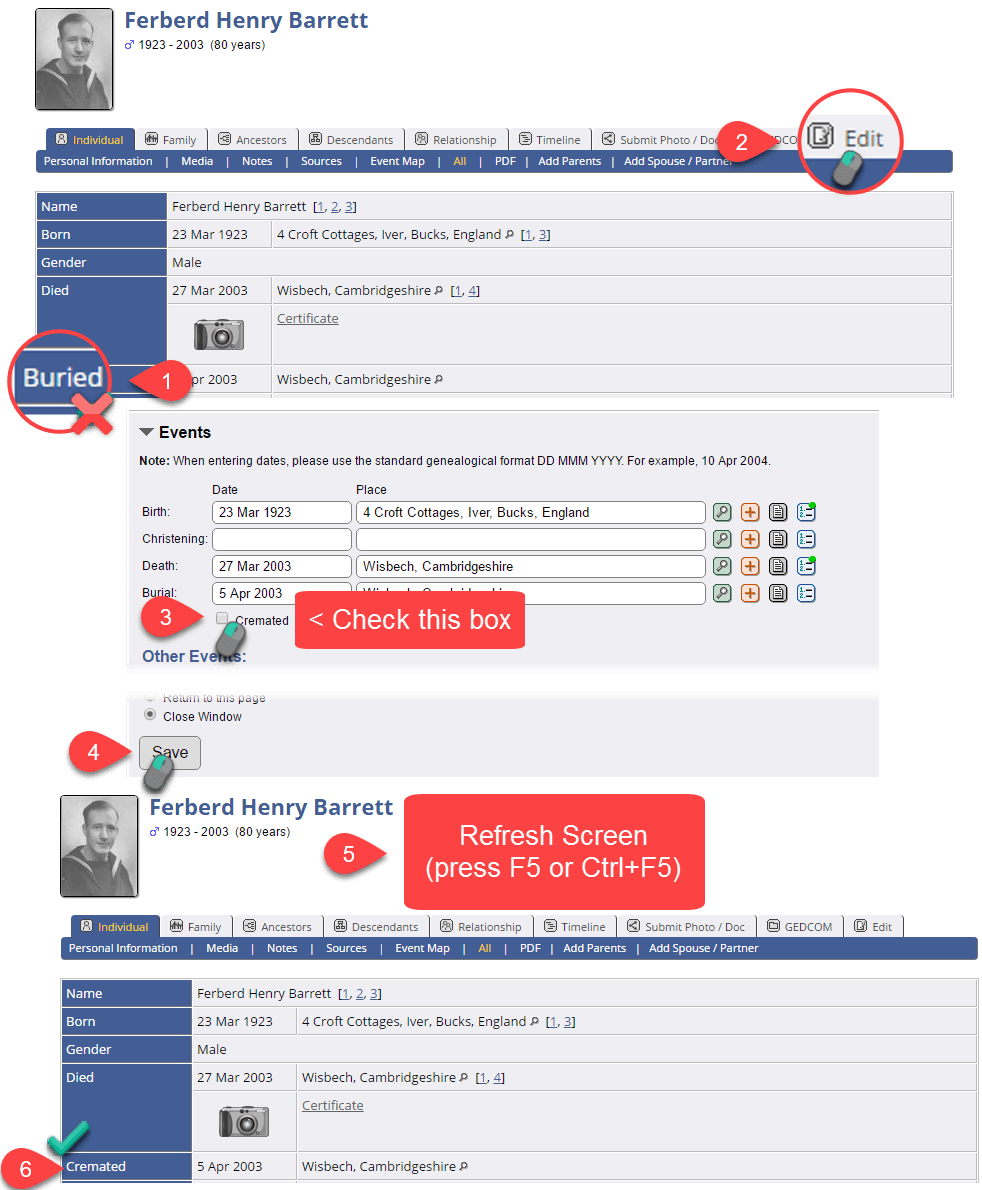
- Burial (and a checkbox to qualify a burial as a cremation)
Where Birth and Death information is absent (as it often is, for example, before 1837 in the UK, when Births, Deaths and Marriage first started to be formally recorded) the system will use the Christening or Burial dates as the closest equivalent. For deceased people Birth and Death dates should be considered as minimum requirements. You don’t have to be precise. Entries such as Abt 1782 are acceptable, Please do not use Unknown. Your best guess is better than Unknown. No date calculations can be carried out on an Unknown date. For more information on date qualifiers see the Use correct ate format entry near the top of this page.
You will notice that Marriage is not listed as a Person Event. See Family Events for the explanations.
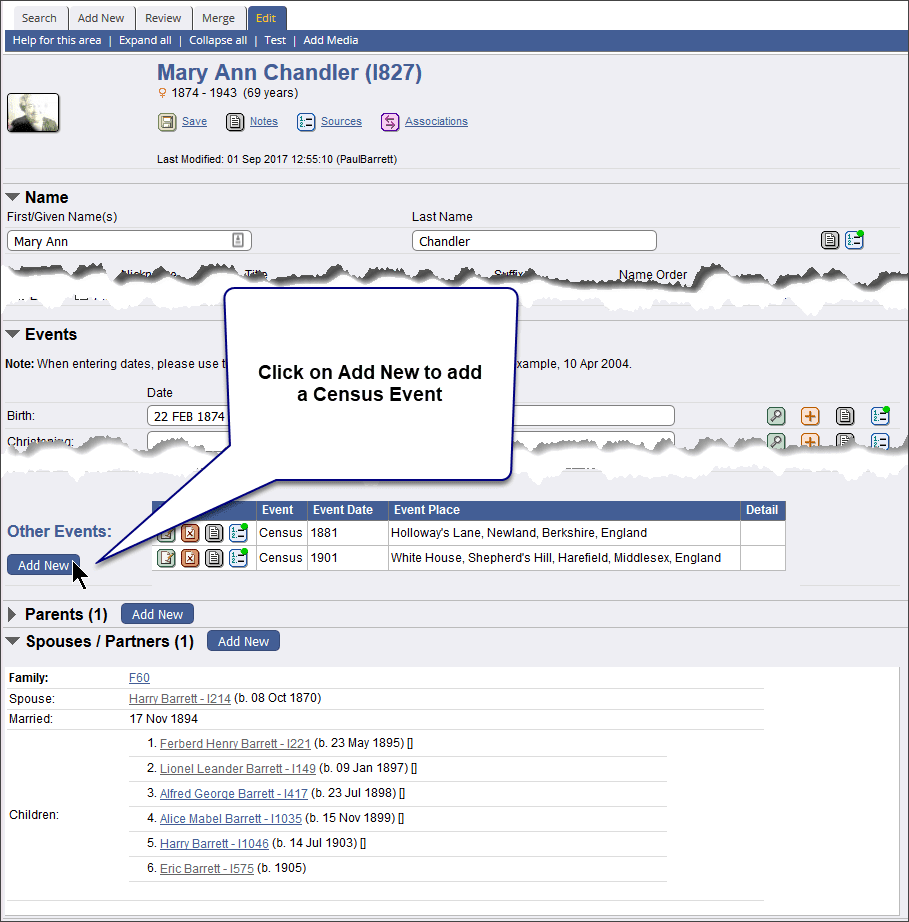
You can, and should, record Other Events. You do so by clicking the Add New button in the Other Events section of the person’s individual record. The scope of Other Events is almost unlimited because Custom Events can be defined. Some of the more obvious Other Events include:
- Graduation
- Other Educational Records (Schools attended)
- Occupation(s)
- Addresses lived at
- Military service
- Probate Dates
- Censuses (see next topic)
The presence of these extra data items helps to enrich the basic facts and presents a much clearer picture of the person. It takes a lot of research to add these events for ancestors and a lot of ancestral data will never be found. We can relieve our descendants of the task by entering as much information we can about ourselves while we are still here to do it.
There’s an extensive list of custom events already enabled. If you need a specific event type that is not covered, please contact me.
Census records are a valuable source of information for the family historian providing new lines of research and important data such as:
- Names
- Ages
- Marital Status
- Occupations
- Mental Health
- Other Family Members
- Addresses
When there is so much information about so many people, adding it all to the TNG tree can be a chore, with a lot of repetitive data entry. This section describes the most efficient and effective way of doing it, to minimise the duplicative effort.
Entering a Census Record is the most complex operation you can perform in TNG therefore it’s easy to make a mistake. As well as the detailed process below there’s a checklist you can use to make sure you don’t miss anything. Click here to view it.
The process starts with a brand new Census record that you have discovered on an online resource such as Find My Past.
Create an image file of the source document
There are various ways to do this
- In Find My Past, with the Census Record image visible, the easiest way is to select the download link at the bottom right of the screen and save the file to your computer. It will be given a reference number as the file name. You should change this to something like. “1911 England Census F Barrett” to make it easier to locate in the TNG media library.
- Take a screen shot using the windows Snip Tool or an application such as SnagIt and save the file as a jpeg or png file on your computer. Please do NOT use any other format.
Find the TNG Record for the Family Head
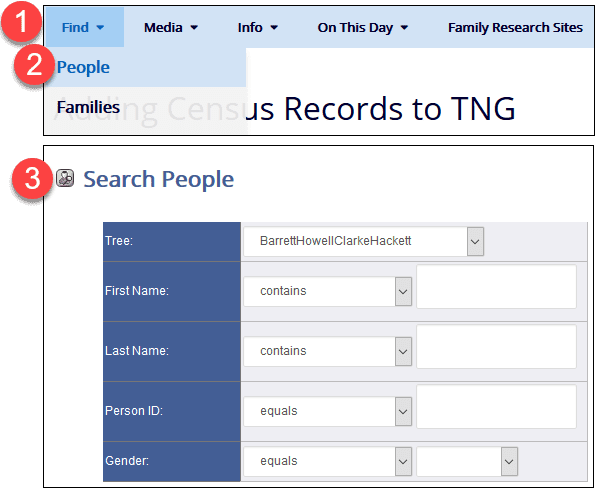
From the OurFamilyHistory menu, select Find > People and enter the Given and Family names.
Tips:
- Be careful of alternate spellings. For example the Barrett family name Ferberd is often entered as Ferbert or Herbert, and Postins uses spellings such as Postan(s), Posten(s), Posting(s). Try searching for the stem of the name such as Post or Ferb, and try changing the options from “Contains” to “Starts with” or “Soundex of”
- Where a woman is shown as head of family with a status of “Widowed” the family name on the Census will usually be her married not her birth name, whereas TNG always uses birth names for women. If you don’t know her birth name, try searching for one of her children (if any are listed). Once you have found a child, you will have a link back to the parents.
Compare the Census and TNG Records
The most obvious thing to look for is information concerning new people, usually children born since the previous Census. Make a note of the names and their IDs. If there are new people to be added, go ahead and do it now.
Tips:
- Ignore Lodgers, Boarders, Servants etc. We are only interested information on family members.
- If new family members are found you need to create their person records before you enter the Census record.
- If a new spouse is identified you will add them through the individual’s record
- If a new child is identified you will add them through the family record (ditto).
- Look out for multiple family entries on the same Census record. For example, the Clarkes in Bagshot and the Barretts in Fyfield often had close relatives living next door or in the same street. You can add a Census record to multiple families in one go, once you have done all the preparation steps in 1 – 3. You do not need to add the image of the census record separately for each family. One copy can be shared amongst multiple families.
- Look out for Grandchildren. “Who’s the parent?” can lead to hours of fun and frustration as you try to decide where they belong.
- Look for children born to a mother who is 50 or more. Unless the mother is especially fertile, the most likely reason is that the child is an illegitimate child of one of her daughters, and is being passed off as hers for propriety’s sake. Solving this requires some detective work. We have found several examples in both the Barrett and Clarke lines.
- As well as adding new people, you might want to look out for who’s not there. Adult children may have married and moved out, so searching for a separate Census record might be necessary. Finding the adult males is straightforward. Finding the females requires more detective work because of the name change. And of course, missing children can often point to the high rates of infant mortality in ancestral times, although they may pop up on another Census record too, visiting or living with another relative, as farming out children seems to have been a common practice. But I would park these issues till later to avoid being distracted from the main task. You can use TNG to record a reminder using a ** Note on a relevant record
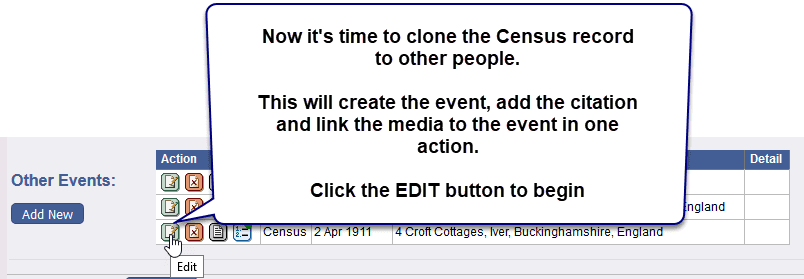
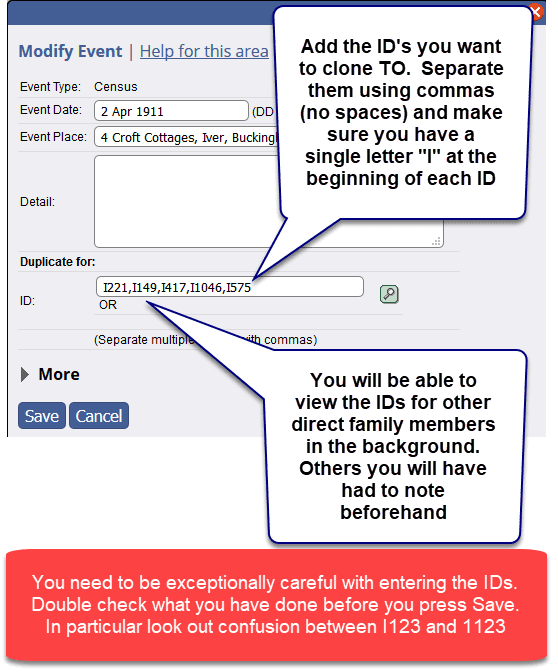
With the exception of the final item, it’s better to resolve all these issues before you process the Census record. That way you will be able to clone Census information from one person’s record to all the others using a single screen in the app. If you add people after the event you will have to re-enter common information (addresses, citations, media links) from scratch in multiple places, which is tedious and can lead to errors.
Adding a Census page reference to a Citation
This is usually a group of four references (until you get to 1911.) Here’s an example from the 1901 England Census:
RG13 617 101 11
- RG13 is the Archive Reference and this one represents the Census for 1901
- 617 is the Piece Number
- 101 is the Folio Number
- 15 is the Page Number
We don’t enter the headings. It would be a chore and add little value since the four group code is easily recognised.
Sometimes the Folio Number is missing when you look at a Census image. If this happens you can either look up the transcription which will invariably have the full reference or make it clear what has been omitted. For example RG13 617 Page 15.
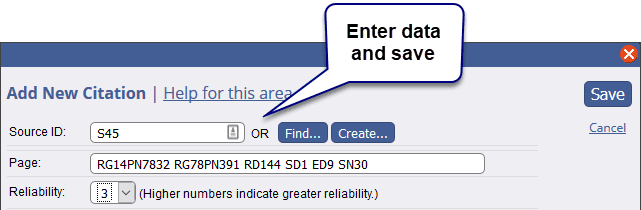
On the 1911 Census the references became far more complex:
e.g. RG14PN7832 RG78PN391 RD144 SD1 ED9 SN30
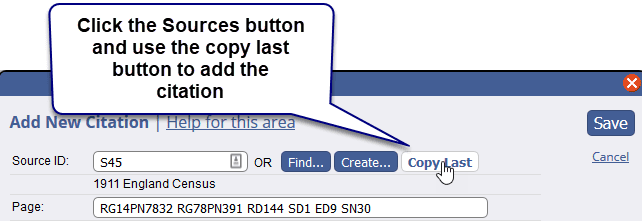
Reusing Citations
Once you have created a Citation, the details will be remembered by the app and the next time you create a Citation record a new option will appear on the Add New Citation screen. It will reproduce the previously saved Citation on the new record and saves a lot of time.
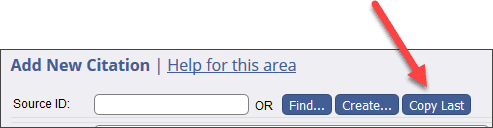
Only the immediately preceding entry is remembered, and it is only stored for this session so if you exit TNG you will need to recreate the Citation from scratch. And if you navigate away to distant parts of the system during your session that may also zero out the Citation record. Nevertheless it still saves a lot of time.
To process a Census Record you need two things:
- An image file of the Census Record (see step 1 in the Preparation section)
- A list of ID Numbers and names for any people you need to include that are not the Head of Household, spouse and children. e.g. Elderly parents living with their children, grandchildren, nieces, nephews, daughters-in-law, brothers, sisters, and any other families that are on the same Census record and are on the family tree. You don’t need to list people who are the Head’s immediate family because those are visible on the screen we will be using.
Quick Check That You’re Prepared
Here’s a quick Checklist to make sure you are ready to go:
- Image File saved to computer with correct name format “
- Head of Household’s record on screen
- Census Record compared with TNG
- Spouse added if necessary
- New families created if necessary
- New people added
- Addresses added and validated
- Citations added


Common Errors
The thumbnail does not appear
Instead you see some text where the thumbnail should be. This is because you did not click the radio button on the “Add Media” page. To fix this:
- Click on the text.
- The media page will display
- Click the Edit Media button
- The Edit Media page will display
- Scroll down to the Thumbnail section and check the radio button that says “Create from Original”
- Save the modified record
- Go back to the individual’s page and review it. The thumbnail should now be visible (you may need to press F5 to refresh the page)
The Census Record appears in a section called Censuses not Census
This is because you did not link the image to the Census Event but only to the person, so the app displays it under its collection name instead. To fix this:
- Click on the text.
- The media page will display
- Click the Edit Media button
- The Edit Media page will display
- Scroll down to the end of the screen where you will see the Media Links section
- Edit the link and add the Census Event
- Save the modified record
- Go back to the individual’s page and review it. The thumbnail should now be visible (you may need to press F5 to refresh the page)
The Census Record appears in a section called Photos not Census
This is because when you imported the media you did not select the Censuses Collection so the system added it to the default Collection – Photos. To fix this, message an Admin and ask them to change the collection for you.

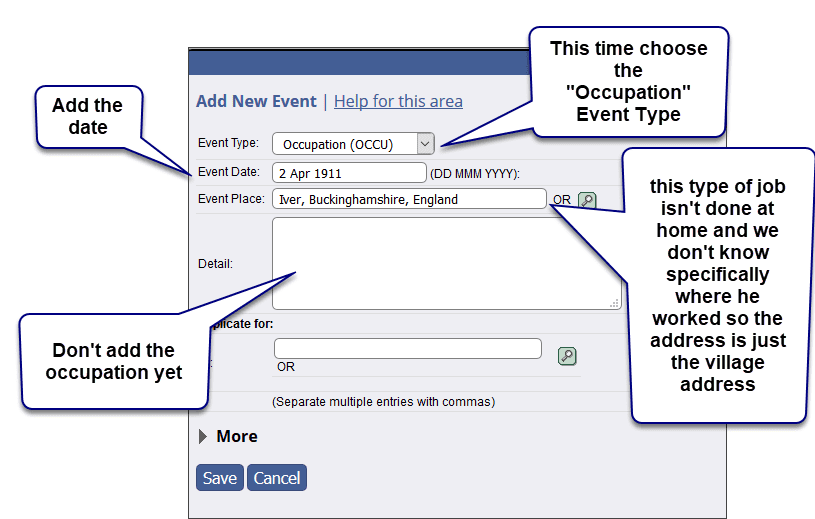
Now create a new citation on the Occupation Event, as we did before:
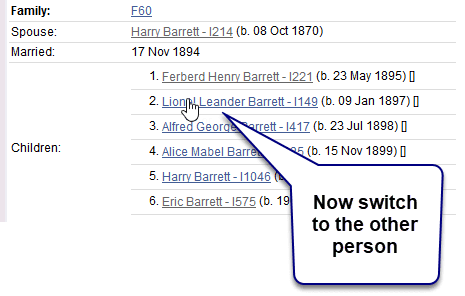
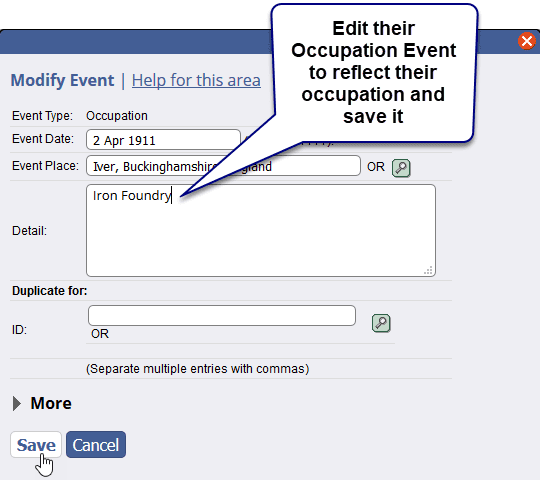
Now you are ready to clone the Occupation Event to the other people who have Occupations, as listed on the Census. Edit the Event and add these details:

The process is now complete. By this stage you will have entered a new UK Census Record in the most efficient possible way while gleaning the maximum amount of information from the Census form.
Don’t forget that you may have a few issues to deal with, that you parked in ** Notes.
Cremations need to be recorded correctly in order to appear correctly. Fortunately, correcting them is as easy as entering them, as demonstrated in this example:
There are a few events that are added at Family level, not person. These are:
- Marriage
- Divorce
- Joint address
These are events that affect two people. Recording them on the family record eliminates the need to record the events twice, against the individual people. For some reason, however, Marriage and Divorce can be added as Other Events to an individual’s record. I don’t know why but please do no not do that; use a Family Event instead.
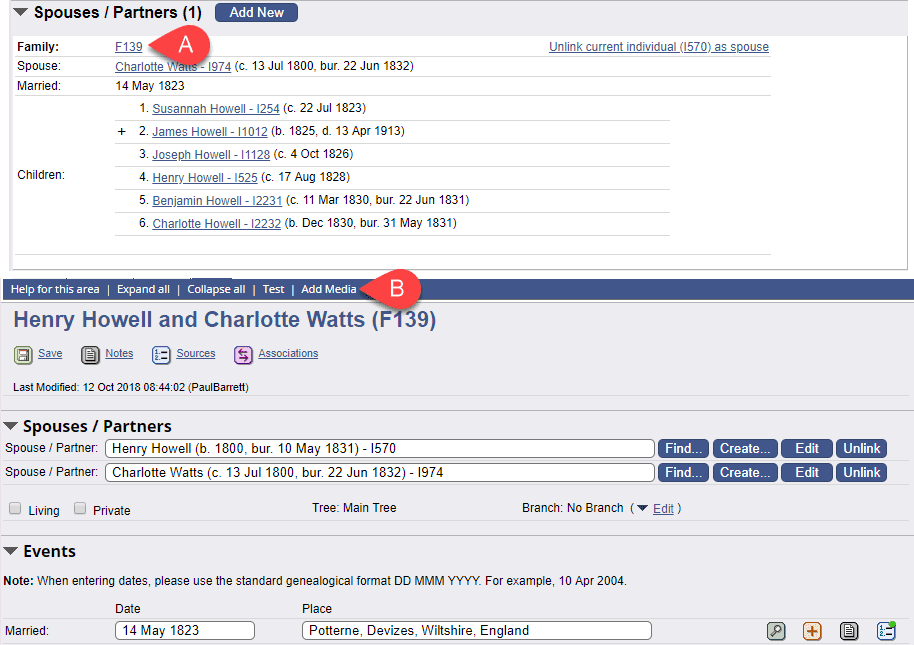
To enter a Family Event, go to an individual’s record, go to Edit mode, and scroll down until you see the Family area in Spouses / Partners, then click on the Family ID
What do we mean by ‘media’?
Media is simply any graphical material that enhances the information we hold about an individual to bring substance and authenticity to their story, and turns the family tree into something more than just a list of names and dates. Media types include:
- Birth, Marriage and Death Certificates
- Christening and Burial records
- School Reports
- Qualification Certificates (School, College, University etc)
- Awards
- Medals
- Military Service Records
- Photos
All of these can be attached to the individual’s record in the family tree.
Adding Media
There are two options for adding media:
- DIY. For regular contributors this is the way to go. You will need to prepare your files using the guidance that follows – see File Preparation – and then look for the section DIY Adding Media.
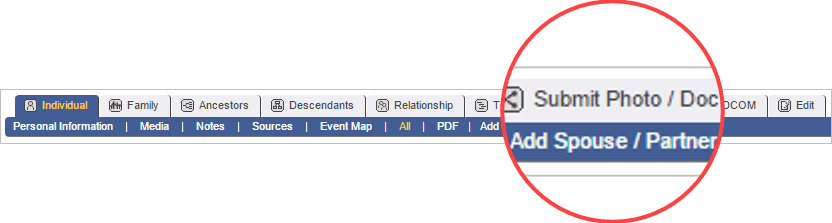
- Ask an admin to do DIFY – this is the easier option , especially if you only have a few photos to add. Look for the Submit Photo / Doc tab on a person’s record. But please do prepare the file – see next section.
File Preparation
Images need to correctly formatted:
Format for size and file type:
Size:
If you have the capabilities to do so please use your photo editing software to save the file for web to reduce the file to a size that will display quickly on a web site.
Format:
JPEG or PNG are the required formats. JPEG should be used except wgen transparency of the background is required
Convert PDF’s to JPEG or PNG
It’s not difficult and you can do it online for free.
This section applies to all types of static media including profile pictures, and supporting documents such as BMD certificates and Census Returns. If you have multiple photos of a family member or group, please see the next section Adding photos to the Family Photo Library.
Go to the page of person where you want the media to appear and click the Edit tab.. Click the Add Media tab to access the Add New Media screen.
NOTE: Marriage and Divorce items are NOT entered on a person record. They are entered on the Family record, apart from that, the steps are the same. The easiest way to find and edit a family record is to go to the person’s page, click on Edit, scroll down until you see the Spouse record, then click on the Family ID
The remaining steps are the same as for a person record
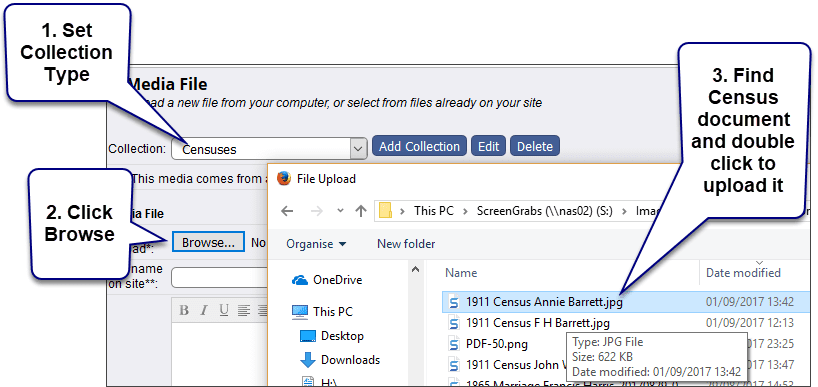
Adding media to a person’s record
- Select the appropriate Collection in the drop-down list.
- Under Media File, click Choose File button to navigate to the image file on your hard drive. Once the file is selected and if file title is correctly formatted, the ”File name on site” field should automatically populate correctly. If it does not populate correctly, could you please do this manually
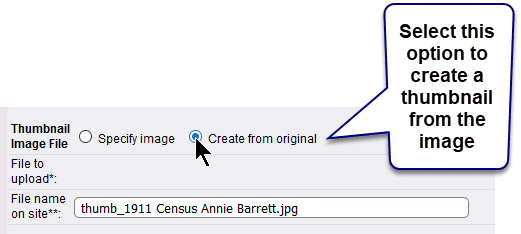
- Under Thumbnail Image File click the radio button named Create from original and a thumbnail photo will be created for you.
- Leave the Store Files in setting at the default Collection Folder
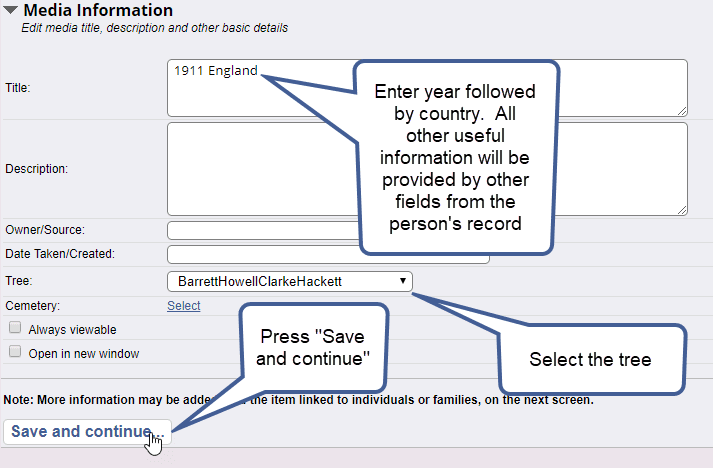
- Enter the title as per the file name. This is the link to the media file and what users later search for in the media listings.
- Enter a description of the media (optional). This will display beneath the title on the page, but not be part of the link itself.
- Ignore the Always viewable box
- Do NOT check the Open in new window box. It is bad practice to force new windows to open in user’s browser unless there is a compelling reason for it, which there isn’t here.
- Click Save and continue… (This uploads the media, saves the title, description and settings, and takes you to the Edit Existing Media screen)
- Set the photo as default for that person if desired. Note: The default photo is normally their profile pic as it is the photo that appears on the top of that person’s profile and on the genealogy charts
- Link additional people, families or places to the media file (for shared headstones, family photos etc). Refer to the Link Extra People, Families, Sources or Place section
- Save the media file
- Reload the person’s page and check that you have achieved the desired result.

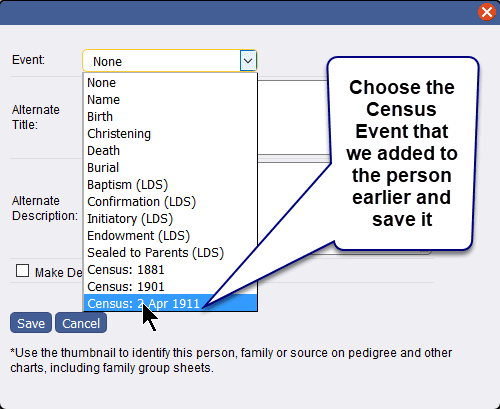
14. By the end of the previous stage, the media file is linked to the person. But we need to go a step further and link the media to the event in the person’s life. Linking to the event ensures that the media file is placed in the correct chronological order in the display, adjacent to the event record rather than placed in a jumbled block of undated media items.
Once you have saved the record (step marker 9 in the image above) scroll down until you see the following:
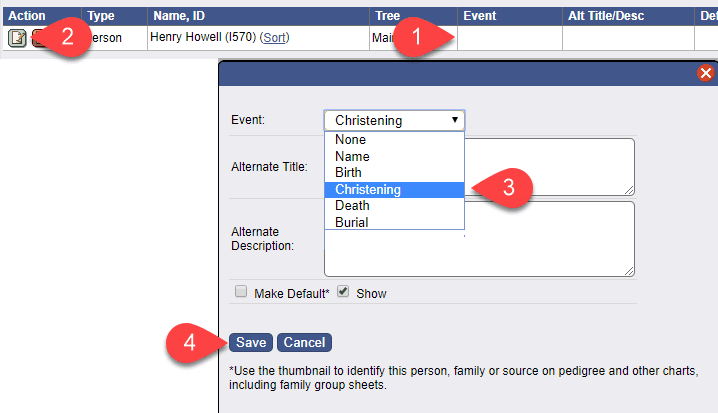
![]() You can see there is no Event listed here
You can see there is no Event listed here
![]() Click this icon to display the Event dialogue box
Click this icon to display the Event dialogue box
![]() Select the appropriate event – note, there are no Marriage or Divorce events because those are entered against the family record, not the person record
Select the appropriate event – note, there are no Marriage or Divorce events because those are entered against the family record, not the person record
![]() Save the record
Save the record
OurFamilyHistory.club is hosted on a commercial web service where disc space has to be paid for. The biggest consumer of disc space is photos so, in the interests of economy, we only store a profile picture of a person on the family history site. All other photos of individuals or groups are stored on a server in Paul’s house using a photo publishing web app. We link to those photos using a hyperlink. The experience is seamless for the users who will probably not even realise the photos are coming from a different site. This is how it looks on an individual’s page:

To achieve this we need to do two things:
- Upload the image files to the server
- Create the hyperlinks to the photo server, on the individual’s page
Send the photos to Paul and he will do the rest. if there are too many to email, an upload link will be provided on request.
Important!
- Please make sure you have done as much of the file preparation as you can – see “Add Media” section above.
- And please make sure that for each photo you provide the following information:
- The names of the people
- Their position in the photo
- The date the photo was taken
- The place the photo was taken
I will send you the link to add to the person’s record (or I may do it for you)
Add the link to the person’s record
If the individual already has a Photo Gallery link on their page then no action should be required. The links are dynamic and will perform a seeded search on the library. So, as long as the image file has been correctly tagged, the new image(s) will be added to the gallery. However, it would be prudent to go to the individual’s page and click the link, just to make sure the new images are appearing. If they aren’t, ping me a message and I will check it out.
Create (and test) the media link on the individual’s page”]This process is a modified form of the process you may have used to add media to a person’s page(the previous section DIY Adding Media). And it’s almost identical to the process for Adding Links to Other External Photo Libraries (see next topic) but for convenience, It’s repeated here
- Copy the share link to the clipboard.
- Go to the page of person where you want the media to appear and click the Edit tab.
- Click the Add Media tab to access the Add New Media screen.
- Select the appropriate Collection in the drop-down list.
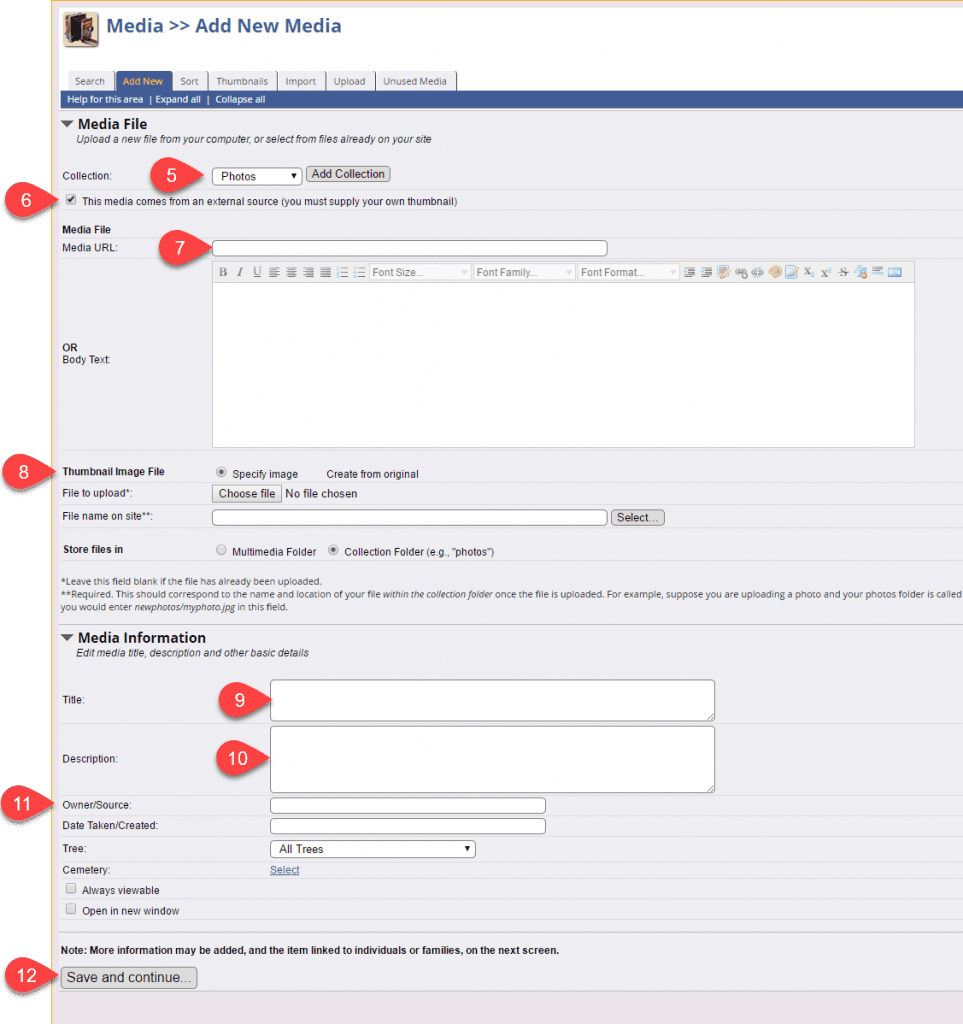
- Check the box This media comes from an external source.
- Paste the URL of the sharing link into the Media URL box
- You should ignore the Thumbnail Image File section completely.
- Enter the Title that will be displayed on the individual’s page. For consistency this should be in the format “Photo Gallery – ” (This will be a clickable link on the person’s page.)
- Enter a description (optional). This will display beneath the title on the page, but not be part of the link itself. Given that you are linking to multiple photos it’s hard to see what purpose this description might have
- Enter details of the source in the format “© “” / Paul Barrett Photo Library” (without the quotes. e.g. © Ray Clarke / Paul Barrett Photo Library
To get the © symbol to display, click the special characters icon Ω on the WordPress toolbar and select the symbol from the table that is displayed. Alternatively, if your keyboard has a separate number key pad, hold down the Alt key, enter 0169 on the keypad and then release the Alt key.3 - Click Save and continue.
- Reload the person’s page and check that you have achieved the desired result.
You can add multiple links for different data types to the media file. The most common type is the photo but by modifying the Media Type selected in Step 2 below, you can carry out the operation on other types. While you have the record open you can also add (if appropriate for the media type) a location to the item, which will then be visible on the location map:
While you have the record open, now would be a good time to add a location to the media item so that it can be displayed on the location map
Scroll down to the next section beneath the links you just created perform the following extra tasks: